HRIS Imports: Salary Import
This article outlines the process for updating employee salaries via an HRIS import.
OVERVIEW
You can use a Salary History Import to update employee salary history in bulk. This is particularly useful during annual reviews or merit cycles.
USE IMPORT TEMPLATE
Download Template: Go to Company > Import Data > Salary History Import > Download Template. Reference rows 1-3 for instructions.
PREPARING THE IMPORT TEMPLATE
Compile Data: Utilize the reporting engine to gather the necessary data, including a unique identifier such as a Work Email. Select a report type based on the changes that are needed. Refer to HRIS Reports for more information.
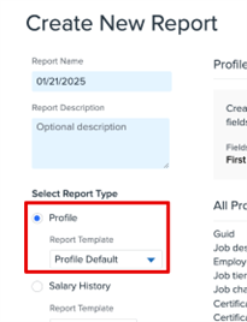
Adding New Salaries: If you need to adjust all employees' salaries by a certain percentage, and it is convenient to see all current salaries in a spreadsheet so you can calculate the new salaries, you can download a Profile report of current salaries.
• In Namely HRIS, go to Home > Admin Tools (on the left side) > Reporting > Create New Report > select Profile as the Report Type > Create Report.
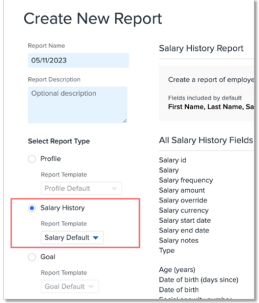
Modifying Existing Salaries: For historical data, refer to the Salary History report to collect the employees’ data
• In Namely HRIS, go to Home > Admin Tools click Reporting > Create New Report > select Salary History as the Report Type > select Salary Default as the Report Template > Create Report.
Update the report: Ensure the report includes all the necessary fields for the import template.
o Required for adding new compensation records:
Work Email (Unique Identifier)
Salary Type (Yearly or Hourly)
Pay Frequency
Salary Start Date
Salary End Date (only required when importing historical salary records)
Currency ISO (three-digit code)
Salary (annual salary divided by the amount of pay periods, OR hourly rate for hourly employees)
Exempt
Payroll Job Code (Required if using multiple job codes)
Payroll Company Name (Required (if Multi-EIN)
o Required for modifying existing compensation records
Work Email (Unique Identifier)
Salary ID (required so the system knows which record to update)
Salary Type (Yearly or Hourly)
Pay Frequency
Salary Start Date
Salary End Date (only required when importing historical salary records)
Currency ISO (three-digit code)
Salary (Annual salary divided by the amount of pay periods, OR hourly rate for hourly employees)
Exempt
Payroll Job Code (Required if using multiple job codes)
Payroll Company Name (Required (if Multi-EIN)
o Optional Fields:
Salary End Date
Salary Notes
Annual Salary Override (Display Wage As: This is what your employee will see on their profile when they are viewing their wage)
Download & Prepare for Import: Download report and save a copy: It's always best practice to save a copy of your data prior to processing an import, in case anything goes awry. Transfer the employee information onto the template or update your document to match the template. Save the file as a .csv.
Tips:
o The first row of each column should be treated as a header row.
o You should only include data on employees that need salary information added on your template.
o Each employee must be listed on a separate row. If importing multiple salary records for an employee (i.e., if building a full salary history), they should be listed on separate lines.
o Each row must have a unique identifier (work email) to match your records to Namely records.
o Salary Amount should not be the annual amount and depends on the Salary Type:
Hourly employees should have the hourly pay defined.
Salaried employees should have the frequency amount defined (amount per pay check)
o Salary amount must be a number value without special characters (such as $ or commas).
o Pay Frequency should be defined as:
Semimonthly
Biweekly
Monthly
Weekly
Annually
o No Special characters such as ‘-‘ are allowed
o Dates should be formatted: MM/DD/YYYY
o Importing a new salary record will automatically end-date an existing salary record; the existing record will show an end-date one day prior to the new salary's start date. If Salary Start Date is left blank, it will default to the date of the import (today’s date). Date format should be imported as mm/dd/yyyy.
o If updating an existing salary record, be sure to include the Salary ID field.
o All fields marked as Required must be completed.
o If you are a multi-EIN client or your company uses Job Codes, these columns are also required for the import to process correctly.
o Your .csv file cannot exceed 5 MB.
o For new employees, a Payroll Employee import must be completed before a Salary History Import or else an error will occur.
UPLOADING THE IMPORT TEMPLATE
Tip:
Before proceeding with the full import, test the process by importing a single row of data. Confirm the import is successful on the employee’s profile. If you need additional support with the import, refer to HRIS Imports.
Steps to Import:
1. When the import file is complete, go to Company Settings in Namely HRIS.
2. Click Settings > Import Data under the Company tab.
3. Scroll down to the Salary History Import section.
4. Click Choose File > upload the completed import template > Upload CSV file.
5. Under Assign Fields, select the unique employee identifier you used in your .CSV file.
6. Use the dropdown selection to map the fields in your import file to their corresponding Namely Field.
7. Click Continue > Import Data
TROUBLESHOOTING
If an error occurs during the import process, an error report will automatically be generated in a .CSV format. Download the file and refer to Common HRIS Import Error Messages to resolve the errors. Once the errors have been resolved, re-import only the rows of data that had issues.
If you're still encountering issues or unresolved errors, submit a case in the Help Community and include the import file and any screenshots of the errors as an attachment.
Category: HRIS / HCM
Type: Imports
THINGS TO CONSIDER
While the salary import will update both the employee's HRIS and Namely Payroll profiles, there are important considerations to be aware of:
• Salary-based volume benefit plans where the benefit amount is typically a multiple of the employee's salary- e.g., basic life, basic AD&D- will not automatically update. In these situations, creating an Administrator Change 2 life event that is connected to only the affected coverage lines is recommended. You can proceed through the Enrollment Wizard for each employee, and their benefit amounts will re-calculate based on the new salary.
o For more information on setting up a new life event and connecting it to coverage lines, please see Creating Life Events
o Updating these benefit amounts can be done with an import, but preparing the import files involves calculating the new benefit amount for each employee; depending on your employee population, it may not be more efficient than using Administrator Change 2. Please reach out to the Service Team via the Help Community if you would like to explore using this import.
• If you have Group Term Life and display this as an imputed income on checks, you will need to recalculate GTL based on the new salary.
• If an employee is Non-exempt, overtime wages will need to be recalculated. Other wages such as double-time (CA employers) or shift differential may also need to be recalculated.
• Remember to discontinue any Fringe Benefit Reimbursements (e.g., cell phone, internet, etc.) that are being ended.
Please see How do I add and edit recurring wage? for more information on adjusting these non-standard earnings.